101st Airborne Division was activated in August 1942 in Louisiana, and its first combat mission was Operation Overlord. On D-Day-June 6, 1944-101st and 82nd Airborne dropped onto the Cotentin peninsula hours before the landings, tasked with capturing bridges and positions, taking out German strongpoints and batteries, and securing the exits from Utah and Omaha Beaches. Things did not initially go smoothly for 101st Airborne, with cloud and antiaircraft fire disrupting the drops resulting in some units landing scattered over a large area outside their designated drop zones and having to waste time assembling-stymied by lost or damaged radio equipment-or trying to achieve their objectives with severely reduced numbers. Casualties were high in some areas due to heavy pre-registered German fire. Nevertheless, the paratroopers fought on and they did manage to secure the crucial beach exits, even if they only achieved a tenuous hold on some other positions. A few days later, 101st Airborne were tasked with attacking the German-held city of Carentan as part of the consolidation of the US beachheads and establishment of a defensive line against the anticipated German counteroffensive. The 101st forced their way into Carentan on 10 and 11 June. The Germans withdrew the following day, and a counteroffensive was put down by elements of the 2nd Armored Division. This fully illustrated book details the planning of the airborne element of D-Day, and the execution of the plans until the troops were withdrawn to prepare for the next big airborne operation, Market Garden.

The 2nd SS Division, "Das Reich," was a battlefront mainstay for Nazi Germany throughout WWII-from the invasion of Poland in 1939 to the final surrender in May 1945. In between it was switched back-and-forth between east and west depending on the crisis, and it fought in nearly every major campaign, from Barbarossa to Normandy, and from Kharkov to the Ardennes.

Das Reich was the first Waffen SS division created (though the title "1st" was reserved for Hitler's Leibstandarte). Originally named the Verfugungs Division, its regiments fought through the campaigns in Poland, the Low Countries, and France, earning the respect of Wehrmacht leaders who originally doubted the efficacy of SS units. Renamed "Das Reich" after the French surrender, its elements served as a spearhead in the Balkans campaign, achieving a daring capture of Belgrade.

In Operation Barbarossa, Das Reich fought with Guderian's Second Panzer Group, first in the drive on Moscow, then toward Kiev, then Moscow again. Pulled out of the line after gigantic casualties, it seized Toulon in France, then was sent back to Russia, as part of the SS Panzer Corps, to retrieve the German debacle after Stalingrad. At the titanic tank-battle of Kursk, Das Reich was at the forefront.

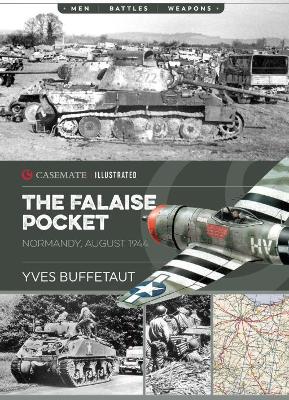
In June 1944, as a full SS-Panzer Division, Das Reich played an infamous role in its approach march to Normandy, as the French Resistance temporarily reached a high tide. On the Allied invasion front, Das Reich not only escaped from the Falaise Pocket but was sent back into it, to retrieve other German units struggling to get out.

Das Reich fought in the Battle of the Bulge, and was then transferred to Hungary, for Hitler's last counteroffensive of the war. Failing to retake Budapest, elements of the division were able to mount a gallant defense of Prague. When the end came, some formations were forced to surrender to the Russians while others made it to American lines. Its reputation, for better or worse, had already been established.

This lavishly illustrated book by renowned French historian Yves Buffetaut lays out the full history of Das Reich in World War II, with rare photos, informative text, and true insights into a unique combat division in modern warfare.

The Falaise Pocket

by Yves Buffetaut

Published 30 April 2019
The battle of the Falaise Pocket, in August 1944, was the turning point in the Normandy campaign. By early August the German Army was in turmoil: while it was managing to hold back the Allies, the defense involved resources that could not be replaced, and the Allies ruled the skies above. In late July, American troops broke through the American lines and pushed south and east, while British and Canadian troops pushed south. Although unable to counter these offensives, Hitler refused to permit the commander Army Group B, Field Marshal von Kluge, to withdraw. Instead he was ordered to launch a counteroffensive at Mortain, the result being that the Germans ended up further into the Allied envelopment. On 8 August Montgomery ordered that the Allied armies converge on the Falaise area—by 21 August the Allies had linked up and sealed the pocket, trapping around 50,000 Germans inside. While many soldiers did eventually escape the encirclement, the losses were catastrophic and by the end of the month Army Group B had retreated across the Seine, ending the battle of Normandy. This illustrated account examines the battle from the failed offensive at Mortain, looking at both German and Allied perspectives, using maps, diagrams and profiles to complete the story.

The Waffen-Ss in Normandy

by Yves Buffetaut

Published 19 April 2018
One of the greatest paradoxes of the Battle of Normandy is that the German divisions found it much harder to reach the front line than the Allies, who had to cross the sea and then deploy in a cramped bridgehead until the American breakthrough of late July 1944. The Waffen-SS were no better off than the Heer units and German high command never quite got on top of operations, as the divisions were thrown into the melee one by one.

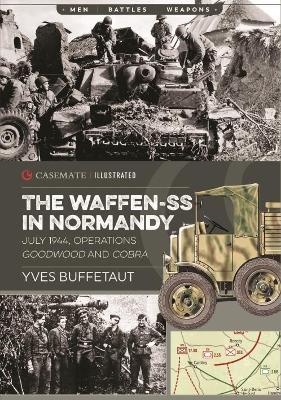
During the month of June 1944, the Panzer divisions present succeeded in containing the Allies in a small bridgehead. In July, the arrival of more SS divisions should have finally allowed the Germans to counter-attack decisively. This was not the reality. The Allies had also strengthened in number and kept the blows coming, one after another. Each SS-Panzer division had a different experience of the fighting in July.

This Casemate Illustrated looks at the divisions one by one throughout Operations Goodwood and Cobra which saw large tank battles and the collapse of the German front in Normandy. It includes over 100 photographs, alongside biographies of the commanders and color profiles of trucks and tanks which played a key role in operations as the Americans succeeded in breaking through the German line of defense.

Monte Cassino. 1944

by Yves Buffetaut

Published 30 September 2019
This Casemate Illustrated title explores the battle of Monte Cassino. To get to Rome, the Allies needed to break through the Winter and Gustav Lines, and in early 1944 they came up against the positions established by the Germans around the historic hilltop abbey of Monte Cassino. Commander General Clark codenamed the assault Operation Raincoat, and after heavy artillery the German army was pushed back to the Gustav Line. Allied strength was increased to 18 divisions (five British, five Commonwealth, one Polish, five American and two French), and preparation for the first battle began. Between January and May, Monte Cassino and the Gustav defenses were assaulted four times, and in May, the final assault saw Monte Cassino eventually captured.

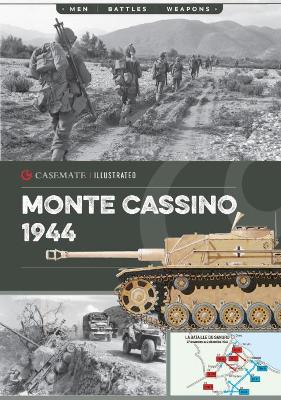
This highly illustrated book has over 100 images and profiles illustrating the tanks and mortars of both the Germans and Allies, as well as several maps.

From Moscow to Stalingrad

by Yves Buffetaut

Published 19 April 2018
The path from Moscow to Stalingrad was littered with successes and losses for both the Red Army and the Wehrmacht, with tensions remaining high and culminating in one of the harshest battles of the Second World War. Part of the Casemate Illustrated series, this volume outlines how it was that, less than a year after their defeat at Moscow, the German army had found a way to make the Soviet troops waver in their defence, with their persistence eventually leading to the Battle of Stalingrad.

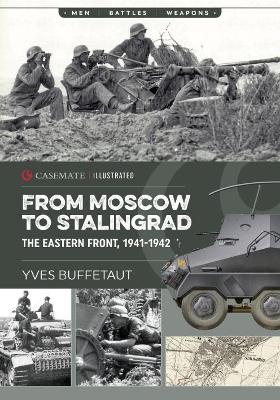
The successful expulsion of the German troops from Moscow in the winter of 1941 came at a cost for the Red Army. Weaknesses in the Soviet camp inspired the Wehrmacht, under Adolf Hitler’s close supervision, to make preparations for offensives along the Eastern Front to push the Russians further and further back into their territory. With a complex set of new tactics and the crucial aid of the Luftwaffe, the German army began to formulate a deadly two-pronged attack on Stalingrad to reduce the city to rubble.

Initially only on the periphery of operations, bit by bit German ambitions focused on Stalingrad. In the lead up to this, Timoshenko’s failed attack on Kharkov followed by the Battle of Sebastopol in June 1942 prompted Operation Blue, the German campaign to advance east on their prized objective. This volume includes numerous photographs of the ships, planes, tanks, trucks, and weaponry used by both sides in battle, alongside detailed maps and text outlining the constantly changing strategies of the armies as events unfolded.

Ardennes 1944

by Yves Buffetaut

Published 18 September 2018
German army deficiencies are often cited as the reason for the failure of the German counteroffensive in the Ardennes region of France, Belgium and Luxembourg in December of 1944 to January 1945 which the Germans called Operation Wacht am Rhein, the Allies named the Ardennes Counteroffensive, and was also commonly known as the Battle of the Bulge. It is certainly true that the three German armies regrouped for the offensive were in differing states; only the 5th Panzer Army was in something resembling good condition, with the 6th and the 7th mediocre at best. The divisions were also often not mobile enough because of the lack of automotive equipment and were short on tanks and artillery. But these cannot be considered as the only reasons for the German failure: it was also the speed of the Allied reaction, and especially the conduct of the Americans, who experienced the some of the fiercest combat of the war, and suffered over 100,000 casualties.

This volume in the Casemate Illustrated series, with over 100 photographs and 24 color profiles describes in detail the different events that caused the German defeat, from the beginning of the offensive on December 16, 1944 to the retreat behind the Siegfried Line. It looks at several topics in particular: the American resistance at St. Vith; the resistance of the 101st Airborne in Bastogne; German obstinacy in persisting with the siege at Bastogne; the airlift and the intervention of the 9th US Air Force; the rapid regrouping of the 3rd US Army; Patton's counterattack; the British counterattack, and finally how the Allies failed to transform the German withdrawal into rout, missing an opportunity to cross the Siegfried line and the Rhine on the heels of the Germans, leading to an incomplete victory.

German Armor in Normandy

by Yves Buffetaut

Published 18 September 2018
Throughout the Second World War, a shift occurred in the composition of the large armored units of armies which lead to an increase in the power of their tanks in particular. The Germans were no exception. Many of its recently formed Panzer divisions, from the 12th SS-Panzerdivision Hitlerjugend to the 2nd SS-Panzerdivision Das Reich, were thrust into the effort to repel the Allies from June to August 1944 in Normandy. Within just ten weeks they would be defeated.

This volume of Casemate Illustrated starts by exploring the initial struggle to gain control of Caen after the Allies had landed on the beaches of Normandy which resulted in the ferocious German Tiger tanks destroying the 7th Armored Division, with British losses totaling twenty-seven tanks. The subsequent strategies the commanders devised for the Panzer tanks during Operations Goodwood and Cobra were not so successful, ultimately ending in disaster for the Germans as the Allies broke through the German line by the end of July.

With over 100 photos, diagrams showing the composition of German armored divisions, and color profiles of tanks and other armored vehicles, this is a detailed examination of the German armored forces in Normandy in 1944, focusing on the organization of the 10 Panzer divisions that took part, the vehicles they relied on and the battles they fought in and why ultimately their combined strength was not enough.